Pages

Thursday, August 23, 2012

Tyler's Second Birthday Party: The Prep

Tyler loves Elmo.  He asks for him every day, "more Momo?".  For his second birthday party it seemed only fitting that we throw an Elmo themed party.  I started a board on Pinterest to get some ideas.  Wow, there are some really creative and crafty people out there! 

Here is the mantel just before his birthday:


And here it is after all the birthday love:


It had just rained for two days straight.  Our backyard was swampy and I knew the kids would want to play outside so I put this basket together of towels and wipes for their feet:


The party favors waiting to be taken home.  I included a few of Elmo's favorite things: bag of gold fish, crayons, and Sesame Street tattoos.


I made a sign for the front door (just in case the balloons on the mailbox were not evident enough that the party starts here):


The cake!  It's a simple store cake from Giant Foods.  I've seen the Sesame Street Big Bird and Elmo in Tow Birthday Cake Decorating Kit on Amazon where you could bake the cake yourself if your feeling ambitious.  I was not.  :-)


I saw this giant inflatable Elmo balloon and had to buy it.  I was so excited to see his face when we brought it home.  He gave Elmo a big hug, then took his hand and led him around the house.


I will post about the actual party soon!  There are too many great pictures to narrow it down!
 

Tuesday, August 21, 2012

Our Lego Duplo House Party

I signed up at the House Party website to host a Lego Duplo Read and Build party and was so excited when this arrived one day:

Inside the box was 4 Lego Duplo Read and Build games and a bunch of other goodies to hand out to the guests:

I got to work right away creating a Lego Duplo board over on Pinterest to get some creative ideas for food and decoration.  {If you are thinking of throwing a Lego party for your kids there is some great inspiration on Pinterest.}

I decided to go the simple route with the food.  I was out of town the day before the party and had no time to bake Lego shaped cookies or mold Lego jello.

The kiddos had a great time playing together and at the end of the party we put names into a hat to see which 3 lucky guests got to take one of the Read and Build sets home with them.

Monday, August 13, 2012

Crafting with AstroBright Paper

This is a Sponsored post written by me on behalf of Astrobrights Papers by Neenah Paper for SocialSpark. All opinions are 100% mine.


AstroBright’s paper is the brightest highest quality paper you can find. Ranging in 23 different colors it is sure to offer your project exactly what it needs to be noticed.  AstroBright's papers are also acid free, which makes them great for scrap booking and crafting with pictures. They also work great in both my laser and ink jet printers.  What sets it apart from other papers is the smooth thick quality of the paper and bright and evenly colored pages.  No fading here! I love to use AstroBright’s to create fliers for my community social committee functions so everyone is sure to see which event is coming up next. I even used them in my wedding invitations and thank you cards 4 years ago.  Astrobrights even has matching envelopes I was able to find online.  It's the perfect solution for any paper crafting no matter how big or small.
If you are looking for some great projects to use AstroBright's paper with check out Astrobrights on Facebook where they have family-friendly "Make Something Astrobright" design challenges that would be fun for the whole family to participate in, and hey, you may even win one of their challenges!!
Right now you can click on over to the AstroBright's website and support your local elementary school by entering the "Give a Brighter Year" sweepstakes. You can win a $500 gift card for yourself and school supplies valued at $30,000 for the school of your choice. Hurry, contest ends September 10, 2012!
Visit Sponsor's Site

Thursday, August 2, 2012

Sewing Project: New Throw Pillows

After my curtain project I got excited to be sewing again.  I decided we needed to update the pillows in the family room to give the room some color. 
I found some fabric I liked (and it was 50% off!).  For $10 I got two new throw pillows:


Tuesday, July 31, 2012

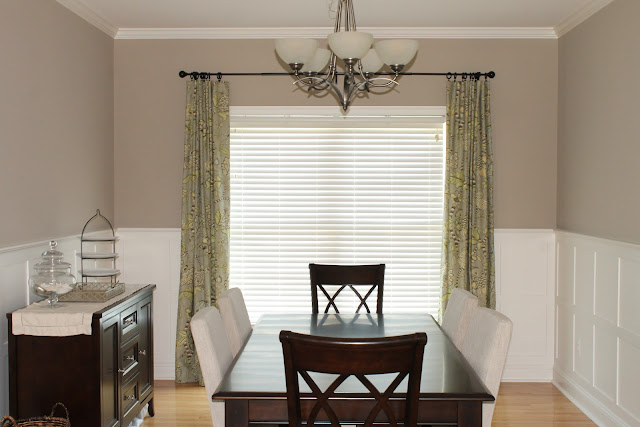
Dining Room Progress: We have curtains!

This particular project was a labor of love for me.  I fell in love with this fabric (P. Kaufmann's Clarice) about a year ago and knew I wanted to use it somewhere in my house.  I finally bought several yards of it when it went on sale about 5 months ago and it sat, leaning up against the window in the dining room for months.

You see, this was my first major sewing project and I was a little intimidated. First, I love this fabric and second, it was pricey. I didn't want to make a mistake and not be able to use it at all.  It took me about 3 days worth of nap times to make the panels.  The first day I measured (and remeasured about 5 times), cut, ironed, and pinned.  The next two days I sewed.


Here is what we started with (picture from the home inspection):
And here is the latest "in progress" photo:


Sorry for the awful pictures!  Photographing a window is hard.  I need to read up on white balance on my camera.

still need to find:
art work
a mirror
rug

Saturday, July 28, 2012

Cleaning House

Literally.  The inside of the house is in pretty good shape with all the small renovations we've done over the last 7 months but the outside hasn't seen much love.  With Tyler's 2nd Birthday party around the corner we needed to get a few things done.

1.  The basement stairs were a mess of rust, chipping paint, and a clogged drain.  Here is a photo from our inspection day:

ignore the jungle grass growing in all directions and the broken hose cart.  See those nasty rust stains? Such an eye sore.
I bought some concrete cleaner and Jeff went to work power washing the stairwell.
Tyler and I watched from the comfort of his air conditioned bedroom.

 It helped but not quite enough and it would take forever for us to clean, sand, and paint the stairs, walls, and railing so we enlisted some help from the guy who sealed our driveway. Little did I know he would bring all of his kids, cousins, nephews, and friends to help him.  Seriously, I wish I had gotten a picture of the craziness.  They did a good job and the stairs look brand new.


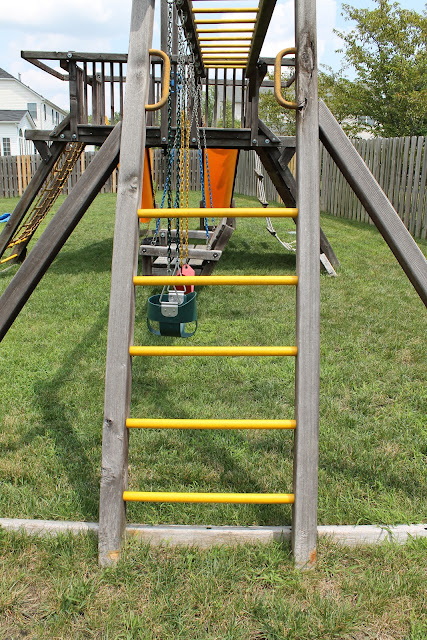
2.  The swing set came with the house and apparently in it's day was one of the biggest models.  It's made by Rainbow Play Systems and is part of their castle series. 


It looked to be in pretty bad shape so we decided to go to check out the showroom in Columbia to see if we could get some new parts and speak to someone about getting a safety inspection.  The place was huge and Tyler had a blast running from play set to play set. 

The salesman said our model runs about $8,000 brand new (holy donut holes, batman!) to which I replied, "Who would pay that for a swing set?!".  Well, apparently a lot of people do.  While we were there 4 other families came in and each bought a swing set.  Who would have thought swing sets would be a lucrative business?
We set up a safety inspection to the tune of $160 which turned out to be a couple of guys that tighten all the bolts with a drill.
We found a nice website where we could purchase coated chain and a ships wheel for Tyler who is really into driving these days. 
I needed a  way to get the black "gunk" off the yellow plastic parts of the swing set and, as with pretty much all random questions that pop in my head in a day, I googled it. I didn't really get any great information.  Instead I set off with my trusty concoction of warm water and ammonia with a tooth brush.  It worked pretty well.  Most of the black gunk came right off.
We also had to remove the busted up flags.  We get some serious wind here (our street acts like a wind tunnel) and the flags had just been ripped to shreds over the years. So here's new updated swing set:


3.  The herb garden continues to be a work in progress.  We started off with a kit from Home Depot that I thought would take about an hour to put together.  WRONG! A few hours later and Jeff doing most of the work we had a garden with organic compost.  What took the most time was leveling the ground so the sides would be even.  Our top soil (if you can call it that) is full of rocks and tough clay material from when the house was built. 


The other reason it took a while: our little helper kept running off with the tools.


Here it is after planting the cilantro and the basil with a jalapeno pepper in the middle:


And here it is now (exactly 3 months later). 
The pepper plant was the first to die.  The cilantro lasted a little while but only long enough to get a couple of batches of salsa made.  I spoke to a successful cilantro grower to get some tips.  He said once it's gone to seed you have to just let it go so that is what I did.  There are tons of little seeds on the ends so I don't want to just cut it back and toss it out.


I planted Rosemary in the middle where the pepper plant used to be and it is doing well.  As you can see, the basil is doing really well.  It looks like a giant basil bush!


4.  The random white bricks on our front patio are an eyesore.  At first glance I thought it was chalk and would be easy to remove with a little water but no.  One of the 7 kiddos that lived here decided one day they wanted a white house instead of brick and began coloring in the bricks one by one with crayon.  Luckily they gave up pretty fast.  I'm guessing they either got caught or ran out of white crayon.


I googled it (again).  Yes, Google and I are BFF's.  If I had money I'd buy stock in it.  Google led me to the Crayola website where they said to use a brush and laundry detergent to get it out.  I armed myself with dish soap and a tooth brush and hoped for the best.


What do you know?  It actually worked!  And it didn't require nearly as much elbow grease as I thought it might.  Thank goodness...


Here's the before and after side by side so you don't have to scroll:


We have a few more outdoor projects to complete so stay tuned!